 .
. 
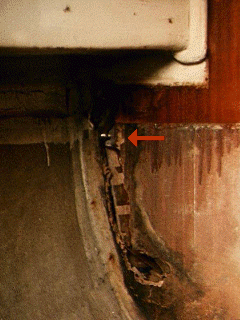
The bolts attaching the port side chainplate had ripped upward through the bulkhead leaving the chainplate sticking out an extra three inches. The top bolt hitting the underside of the deck stopped the chainplate from coming all the way out and dropping my mast in the drink.
Thus began almost seven months of spending every spare minute taking apart and reconstructing my boat. I learned a lot in the process and I'll share some of those things as time goes on. I'm hoping that you folks will contribute or point me towards tips to add to this page.
I pulled out the cabin benches and cabinets to expose the main bulkheads and found what you see in the accompanying pictures. The red arrow points at the chainplate which was mounted to the back of the bulkhead. I made the hole that extends below it by pushing my hand through the wood.
 .
. 
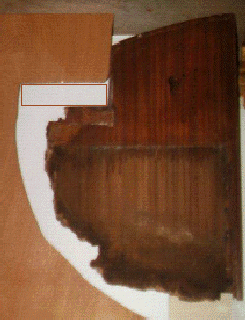
The second picture shows the bulkhead after it was removed and the piece of mahogany from which I cut the new bulkhead. With the exception of the red rectangle and the triangular area at the top of the picture, the mahogany cutout is the exact shape and size of the replacement piece. The starboard bulkhead was in similar condition.
It didn't stop there. The next bulkhead forward supported the vee berth. I pulled it out in three pieces without using any tools. In addition, I replaced one bench top, the aft sides of both cabinets, and the cabin sole. I also replaced one bulkhead between the cabin and the cockpit locker and repaired the other one.
Here are some of the things that I did or learned.
Having just taken ownership of the boat, I didn't have this opportunity. But because the chainplates are so far back up under the deck, missing leaks is easy to do. Check them regularly. If you have caulked everything, but continue to have mystery leaks on the underside of your deck, check the hull-deck seam. On my '64 C-24, the hull and deck each have a flange that stick up from the deck and are capped by the toe rails. I pulled mine off to refinish them and to make it easier to paint the deck, and found that the caulk no longer filled the gap in many areas. I think that capillary action was drawing water up under the toe rails and then it leaked down into the boat. Given the wrong circumstances, you could siphon water off your deck into the boat.
And check your measurements at critical points during assembly. When I tried to put the refinished trim strips on the inboard edge of my new bulkheads, I found they were too long. They had been the only solid wood holding the cabin up and when I removed them the cabin sagged about an inch and I didn't notice. Then I made the patterns for the new bulkheads. When you are 6'2" the loss of an inch of the nominal 5'9" headroom can be a real headache.
Write down all measurements, and make lists of parts and tools. You might feel silly writing "Take stepladder" on your list, but you will feel even sillier if you drive 1 1/2 hours to get to your boat only to discover you left your ladder at home. My boat's deck is at least 5' in the air when the boat is on jackstands.
I started doing this early on and it has really helped. Dropping a bolt in the drink is no problem if you have spares. Get a divided box that closes securely and put all unused fasteners in it. More than once I have changed plans in midstream, but had spare fasteners on board to do the job anyway.
And then don't be disappointed. I live way too far from my boat to have dead time because the jobs went faster than anticipated. And more than once I had to postpone one part of the job, but was prepared to work on something else, so I still made maximum use of my time.
That's just a partial list of suggestions, but it's a good start. Hope your projects go well! Eric White (ewhite@monumental.com)